April 23, 2026
/
Before a single shovel hits the dirt, the success of your pool installation depends on what you already have in the ground. A thoughtful site assessment — checking slope, soil, drainage, access, and what’s buried under the grass — saves money, prevents delays, and turns a stressful project into a predictable one. Whether you’re hiring a full-service installer or acting as your own general contractor on a DIY fiberglass pool installation, this guide walks you through how to prepare your yard for pool installation, step by step.
You won’t need a degree in civil engineering. You will need a tape measure, a notepad, and about an afternoon of honest looking. If you’re still weighing pool materials, our article on why fiberglass pools make sense for most homeowners is a useful first read before you start mapping your yard.
1. Start by Walking Your Yard
Every good site assessment begins the same way: standing in your backyard with a clear head and asking where a pool actually belongs. Before the technical details, spend time observing how the space works today.
Sun exposure. Fiberglass pools warm faster in direct sun, and natural sunlight extends your swim season without running the heater as hard. Track where the sun falls at different times of day. A south-facing location with six or more hours of direct sun is ideal. Heavy shade from the house, trees, or a neighboring structure will cost you in water temperature and heating bills.
Privacy and sightlines. Walk the yard from the kitchen window, the deck, and from where your neighbors can see in. Where does the pool feel like a natural extension of the house? Where does it feel exposed? Privacy considerations shape not only pool placement but also fencing, landscaping, and patio design later on.
Yard size and pool fit. Measure the usable area. “Usable” means flat-or-flat-ish ground that isn’t occupied by septic fields, easements, or root systems you don’t want to disturb. Compare that measurement to the footprint of the pool models you’re considering. PBU offers small, medium, and large fiberglass pool designs sized to fit a range of backyards, and choosing the right size and shape starts with knowing exactly what you’re working with.Proximity to the house. Plumbing and electrical runs back to the equipment pad get more expensive the farther the pool sits from the house. Closer isn’t always better, but pushing the pool to the back corner of a deep lot can add a significant cost.
2. Evaluating Slope and Topography
Yards are rarely flat. That’s not a dealbreaker for a new in-ground pool, but slope changes both the install plan and the final price.
Stand at the highest point of your yard and look toward the lowest. If you can see a clear downhill run where you’re hoping to put the pool, you’re working with a sloped site. A simple way to estimate the grade: stretch a long string between two points, level it with a line level, and measure the drop from the string to the ground across a known distance.
Fiberglass pool shells must sit level. On a sloped lot, that means either cutting into the hill (removing soil), building up the low side with engineered fill and a retaining wall, or some combination. Each approach has real cost implications. Gentle slopes are usually manageable. Steeper lots may need engineered solutions and specialty excavation.If you’re torn between a flat-bottom or sloped-bottom pool design, flat bottom vs. sloped pools breaks down how each design interacts with your yard’s natural grade.
3. Soil Type and Drainage
What’s under your grass matters more than most homeowners expect.
Soil type affects load-bearing and drainage. Sandy soils drain quickly but shift more. Clay soils hold water and can swell or contract with moisture. Loam (a mix of sand, silt, and clay) is generally the most forgiving. Rocky soils can be great for stability but expensive to excavate.
Signs of drainage trouble to watch for:
- Standing water that lingers more than 24 hours after rain
- A persistent soggy patch, even in dry weeks
- Water pooling against the house foundation
- A visible flow path during storms that runs through your proposed pool site
If your backyard floods where you want the pool, the issue usually isn’t the pool — it’s the existing grade and subsurface drainage. A French drain, regrading, or a swale may be part of the prep work. These aren’t optional. Installing a pool in a poor-drainage area without addressing it invites long-term problems with the surrounding patio, landscaping, and even the shell itself over time.
For some sites (especially steep slopes, known fill areas, or lots with visible water issues) a geotechnical soil test is worth the modest investment. It tells you exactly what’s down there before you commit to a plan.
4. Access for Excavation Equipment
This is the assessment point that catches the most homeowners off guard.
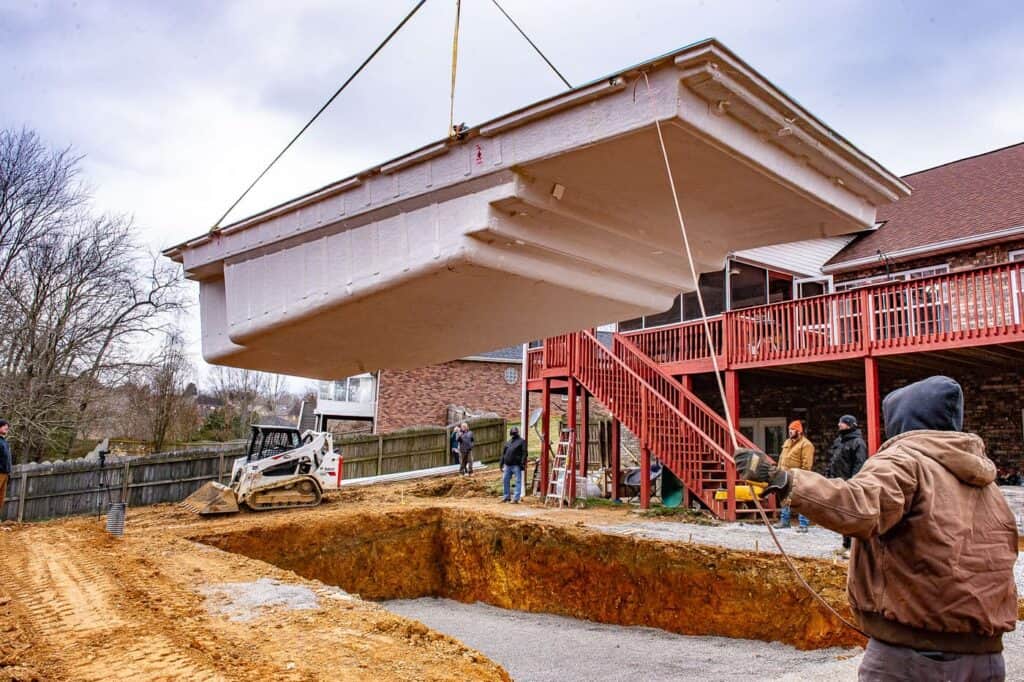
A fiberglass pool shell arrives on a truck and gets lifted into an excavated hole, often by a crane or a large-track excavator. That equipment needs a clear path into your backyard. Walk the route from the street or driveway to the proposed pool site and look for:
- Gate widths: most gates are too narrow for excavation equipment and need to be temporarily removed
- Fence lines: sections of fence often need to come out, then go back up
- Overhead obstacles: low power lines, tree branches, roof eaves
- Hardscape: paver walkways, retaining walls, concrete slabs that would be damaged
- Underground irrigation: sprinkler lines rarely survive an excavation route
- Tight corners: some houses on narrow lots simply can’t fit traditional access and require a crane set-up over the house instead
Tight-access yards aren’t impossible, but they often call for specialty equipment or a crane lift over the house, which adds cost. Flagging this early means no surprises on install day. For a realistic sense of timelines once equipment access is sorted, how long it takes to install an inground pool walks through a typical schedule.
5. What’s Underground, and What’s Restricted
Not everything affecting your pool project is visible. Before you lock in a location, check what’s below the surface and what rules apply to your lot.
Call 811 before you dig. Every state has a free utility-locating service. A quick call gets gas, electric, water, sewer, and communication lines marked on your property. This step is legally required in most jurisdictions before excavation, and skipping it is both dangerous and expensive.
Septic systems and drain fields. Homes on septic must keep the pool a safe distance from both the tank and the drain field. Building over or too close to a drain field isn’t just a code issue, it can destroy the system. Pull your septic records or have the system located before finalizing pool placement.
Setbacks, easements, and property lines. Most municipalities require pools to sit a minimum distance from property lines, the house, and other structures. Utility easements (strips of land where the power or water company has a right of access) are off-limits for permanent structures. These distances vary by county and sometimes by zoning district, so confirm with your local building department before finalizing pool placement.
HOA rules and covenants. If you’re in an HOA, pool approval is often its own process separate from the building permit. Review your covenants for restrictions on pool size, materials, fencing design, and required setbacks.
Plan your fence early. Residential pools are subject to barrier requirements in nearly every jurisdiction, and those rules shape where a fence can go — which in turn affects pool placement, patio layout, and equipment pad location. Exact fence and barrier specifications vary by state, county, and sometimes municipality, so always confirm the current requirements with your local building department before finalizing any plans.Permitting itself varies widely across states. Check out the permitting section of our blog for more specific information for your state.
6. Trees and Root Systems
Mature trees are an asset, until they’re in the way of a pool.
Proximity. Trees close to the pool mean shade (good for glare, bad for water temperature and algae), falling leaves (more skimming, more chemicals), and root pressure on the pool shell and plumbing (consistently bad over time).
Root damage potential. Excavation near mature roots often requires tree removal for the health of both the tree and the pool. Cutting major roots without removing the tree leaves it structurally compromised and dangerous.
Removal considerations. Budget for arborist or tree-removal service costs, stump grinding, and any permits your jurisdiction requires for removing large or protected trees. Some areas — especially coastal, historic, or HOA-governed neighborhoods — protect specific species or tree sizes.Future growth. A sapling 15 feet from your pool today can be 40 feet tall in 20 years, with a root zone that reaches directly under the shell. Think long-term when deciding what stays.
7. When Grading Is Required, and What It Involves
Grading is the process of reshaping the ground to create a level, stable base for the pool and to direct water away from it.
You’ll almost certainly need some grading. Even on relatively flat lots, the pool excavation, patio base, and drainage paths all require controlled earthwork. On sloped lots or sites with drainage problems, grading becomes a more significant project.
Typical grading work includes:
- Cut and fill — removing soil from high points and moving it to low points to create a level pad
- Compaction — mechanically pressing the fill material so it won’t settle under the weight of the pool and water
- Drainage shaping — creating a gentle slope away from the pool on all sides to move water toward swales or drains
- Patio base prep — building a stable, graded sub-base for whatever decking material you choose
After the pool is set, a final grading pass shapes the ground around the shell: gently sloping away from the pool, tying into the patio base, and making sure surface water has somewhere to go besides back into your newly excavated hole.
Is grading a DIY job? For a flat lot with minor leveling, a capable homeowner with rented equipment might manage the initial rough grade. But precision final grading, proper compaction, and drainage engineering on anything other than an easy site are usually worth hiring out. The cost of fixing a poorly graded pool site later is almost always higher than the cost of getting it right up front. For a complete picture of where pros are required, fiberglass pool hidden costs covers site prep and related line items in detail.
Timing matters too. Off-season pool installation can actually work in your favor for grading-heavy projects, giving your yard time to settle before the first swim season.
Yard Assessment Checklist
Use this table as a walkthrough tool when evaluating your yard. It’s also worth revisiting before you sign contracts — what you miss in round one often shows up with fresh eyes.
| Condition | What to Look For | Typical Handling |
|---|---|---|
| Sun exposure | Hours of direct sun, orientation of yard | Homeowner can assess |
| Yard size & layout | Usable flat area, pool footprint fit | Homeowner with tape measure |
| Slope & topography | Drop across the proposed pool site | Homeowner for rough check; contractor for final grade |
| Soil type | Sandy, clay, loam, or rocky | Contractor or geotech for confirmation |
| Drainage | Standing water, flow paths, soggy spots | Homeowner observes; contractor designs solutions |
| Equipment access | Gate widths, overhead wires, hardscape | Installer or contractor verifies |
| Utilities & septic | Underground lines, tank and drain field location | 811 call + septic records |
| Setbacks & easements | Property lines, easements, HOA rules | Local building department + HOA records |
| Trees & roots | Proximity, species, long-term growth | Homeowner + arborist if removal needed |
| Fencing | Barrier placement before finalizing layout | Local building department for requirements |
A good site assessment answers most of the questions a contractor or installer will ask at your first meeting. If you’ve done the walkthrough above and want expert eyes on what comes next, request a quote from Pool Brokers USA and we’ll help you sort out what’s straightforward, what needs attention, and what it realistically costs. We serve families across all 17 states in our service area, with both full-installation and DIY purchase paths.
What’s Realistically DIY vs. When to Call a Pro
Homeowners who act as their own general contractor on a pool project usually do well when they know their limits. Here’s a realistic breakdown of the yard-prep phase. If you’re weighing a fully managed installation versus the DIY path, this should help your decision making.
| Task | DIY Realistic? | Notes |
|---|---|---|
| Walking the yard & initial assessment | Yes | This guide is built for exactly that! |
| Measuring and mapping the pool footprint | Yes | Stakes, string, and a tape measure |
| Calling 811 for utility locates | Yes | Free and legally required |
| Checking setbacks, easements, HOA | Yes | Time in records, not physical labor |
| Pulling permits | Often yes | Varies by state; see our state permit guides |
| Tree removal | Sometimes | Small trees yes; large or protected trees, hire a certified arborist |
| Rough grading on a flat lot | Sometimes | Rented skid steer; requires experience |
| Excavation for the pool | No | Specialty equipment, precision grading, liability |
| Final grading and compaction | No | Requires proper equipment and technique |
| Drainage engineering | No | Gets expensive to fix later |
| Plumbing and electrical | No | Most jurisdictions require licensed pros |
For a fuller decision framework, our full DIY-readiness guide walks through the financial, practical, and lifestyle considerations. Builders and residential contractors looking to offer pools as part of new construction can start with our home builder program, which handles the pool sales, client education, and install coordination on your behalf.
Frequently Asked Questions about Pool Installation
Can you build a pool on a sloped yard?
Yes. Sloped yards are common, and fiberglass pools can be installed on them with proper site prep. Depending on the grade, the work may involve cutting into the hill, building up the low side with compacted fill, or adding a retaining wall. Gentle slopes are usually straightforward. Steeper or engineered lots need a contractor familiar with hillside pool installation.
How much more does it cost to install a pool on a slope?
Slope-related costs depend on the degree of the grade and the solution required. Minor grading adjustments add relatively little. Significant cut-and-fill work, retaining walls, engineered drainage, or specialty access can each add meaningfully to the project. A qualified installer or excavation contractor can price these against your specific yard after a site visit.
Why is my backyard flooding where I want to put a pool?
Backyard flooding usually points to one of three things: existing grade directs water toward that spot, the subsurface soil drains poorly, or there’s an underlying groundwater issue. Each of these needs to be addressed before — or as part of — pool installation, typically through regrading, French drains, swales, or a combination. Ignoring drainage problems usually means worse problems after the pool is in.
How do I know if my yard is big enough for an inground pool?
Measure the usable flat area of your yard — excluding septic fields, easements, required setbacks, and anything you don’t want to remove. Compare that space to the footprint of the pool you’re considering, leaving room for decking, fencing, and equipment. Fiberglass pools come in sizes designed to fit small, medium, and large yards, so most properties have at least one workable option.
What’s the first thing to do when preparing my yard for a pool?
Walk the yard and evaluate placement first — sun, size, proximity to the house, and obvious obstacles. Then check the regulatory side: utilities, septic, setbacks, easements, and HOA rules. Those two passes usually tell you whether your preferred location is viable before you spend any money on design or engineering.
Do I have to grade my yard before installing a fiberglass pool?
Almost always, yes — at least to some degree. Even on flat lots, the excavation, patio base, and drainage paths need controlled grading. On sloped or problem-drainage lots, grading is a larger part of the project. The exact scope depends on your site.
Can I do the site prep myself, or do I need a contractor?
The assessment and planning phases of site prep — walking the yard, measuring, checking utilities and setbacks — are well within DIY range. The physical prep — excavation, precision grading, compaction, drainage engineering — is usually best handled by experienced contractors or your pool installer. The DIY-friendly parts are about making informed decisions, not operating heavy equipment. For a clear picture of how a PBU project moves from assessment to install, our pool ordering process walks through each step.
Ready to Turn Your Yard Plan Into a Pool Plan?
A prepared yard is half the battle of a successful pool installation. The homeowners who end up happiest with their pool are the ones who understood their site before the first contract was signed — not the ones who hoped it would all work itself out.
If you’re ready to turn your site assessment into a real plan, request a quote. We’ll walk you through pool options that fit your yard, talk honestly about what your specific site needs, and help you choose the path — full installation or DIY — that makes sense for your family.
Latest Posts
Shell Price vs. Total Project Cost: Reading a Fiberglass Pool Quote
The First-Time Buyer’s Guide to Fiberglass Inground Pools
Cold-Climate Showdown: How Fiberglass and Concrete Handle Freeze-Thaw Cycles
7 Costly Mistakes First-Time Fiberglass Pool Buyers Make
Thinking of Replacing a Concrete Pool With Fiberglass? Read This First
Will Adding a Pool Raise My Property Taxes?
Fiberglass vs Vinyl Pool: The 10-Year Cost of Replacements
Installing a Fiberglass Pool in Clay Soil: Drainage, Backfill, and Cost Guide
How Much Does It Cost to Fill a Pool With Water?
When to Start Planning Your Pool Installation (So You’re Swimming by Summer)
Visit Our Blog
Share This Post